I'm Caitlin - culinary hostess, wellness retreat curator, and homebody at heart. This blog is where I share seasonal recipes, intentional living tips, and behind-the-scenes moments from my kitchen, travels, and retreats.
Here to make healthy living feel thoughtful and approachable - one recipe, ritual, or gathering at a time.
WELCOME!
Affiliate links included. Thanks for supporting the brands I trust!
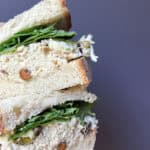
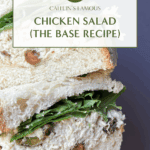
This isn’t just chicken salad. It’s the chicken salad I come back to again and again. Simple, creamy, and endlessly customizable. Whether you load it up with your favorite mix-ins or keep it classic, this base recipe is where the magic begins.
I’ve made a lot of chicken salad over the years, but this base is the one I always come back to (and the one people rave about after trying it). It’s simple, nourishing, and totally adaptable depending on what I have in the kitchen (or what I’m craving that week).
The beauty of this recipe is that it gives you a starting point to get creative. Some days I’ll add pistachios instead of celery, or toss in dried cranberries, chopped herbs, or fresh fruit. The image here? I swapped in pistachios because I was out of celery, and honestly, it might be one of my favorites.
This post is all about the base version I use on repeat. I’ll be sharing more of my favorite variations in future posts, so be sure to check back (or bookmark this one as your go-to).
optional : nuts, fruit, herbs, or other add-ins (more on that later)
EQUIPMENT OVERVIEW
Large pot or saucepan for boiling chicken
Stand mixer or handheld mixer (for shredding chicken)
Glass measuring cup for mayo prep
Whisk or immersion blender
STEP-BY-STEP INSTRUCTIONS
Boil the Chicken : Bring a large saucepan or pot of water to a boil. Add the chicken tenders and cook for 17 minutes, or until cooked through. You’ll likely notice the rolling boil slow to a gentle simmer after adding the chicken. That’s totally normal. When your timer goes off, remove the chicken with tongs and transfer to a large bowl to cool slightly.
Prep the Mayo : Crack your egg into a glass mixing cup and whisk on high with a handheld mixer or immersion blender for 20 seconds. Add 1/3 cup of avocado oil and blend again for 20 seconds. Repeat until you’ve added a total of 1 cup of oil. The mixture should emulsify into a thick, creamy mayo. Season with sea salt and refrigerate until ready to use. Note : I highly recommend making your own mayo here. Store-bought versions tend to have a more distinct flavor that can shift the entire dish – and not in a good way. Every time I’ve made this with homemade mayo (and others have echoed this too), the final flavor is just cleaner, fresher, and way more balanced. Once you try it, you’ll notice the difference.
Shred the Chicken : Once the chicken has cooled slightly, transfer it to a stand mixer and mix on medium using the beater attachment until finely shredded. You can also shred by hand using two forks or a handheld mixer – whatever works!
Refrigerate Overnight : I know this adds time to the prep, but trust me, it’s worth it. Refrigerating the chicken overnight (or at least a half day) makes the consistency creamier and helps prevent your homemade mayo from thinning out. Remember, we’re not using any thickeners or stabilizers – heat will break the mayo down. I like to prep the mayo and shredded chicken the day before, so all you have to do is mix and enjoy.
Mix It All Together : Add your mayo and any additional mix-ins, and stir until well combined. Chill for at least 15 – 30 minutes before serving to let the flavors come together.
WAYS TO SERVE IT
This chicken salad pairs well with :
Fresh Berries and Leafy Greens
Gluten-Free Crackers or Toasted Sourdough
Homemade Pita or Lettuce Wraps
Stuffed in a Croissant
STORAGE TIPS
Because this chicken salad doesn’t contain preservatives and you’re likely using fresh mix-ins, I recommend enjoying it within 3 days of making. Store in an airtight container in the fridge.
FREQUENTLY ASKED QUESTIONS
Can I use chicken breast instead of tenders?
Yes, just be sure to butterfly or slice them so they cook evenly and don’t dry out. I recommend slicing each chicken breast into 3 pieces.
Do I have to make homemade mayo?
No, but it will alter the final taste. Store-bought versions tend to have a more distinct flavor that can shift the entire dish, and not in a good way. Every time I have tried this with a store-bought mayo, it doesn’t deliver the same quality or flavor that coined this recipe a favorite for countless people who have tried it!
How do I customize this recipe?
This base is perfect with whatever you have on hand – celery, chopped nuts, fruit, herbs, and even flavored balsamic (more on that in the recipes showcasing some of my favorite variations!). Keep it simple or make it fancy!
What’s the mix-in shown in the photo?
That version includes pistachios instead of celery (because that’s what I had on hand). I’ll be sharing more variations like Cranberry Pecan, Pineapple Coconut, and Apricot Almond.
If you give this recipe a try, I’d love to hear what twist you put on it. Tag me on Instagram or drop a comment below. I can’t wait to hear what you think!
A simple, creamy chicken salad base that’s endlessly customizable and packed with real-food ingredients. Perfect on toast, greens, crackers, or stuffed in a croissant.
Boil the Chicken : Bring a large saucepan or pot of water to a boil. Add the chicken tenders and cook for 17 minutes, or until cooked through. You’ll likely notice the rolling boil slow to a gentle simmer after adding the chicken. That’s totally normal. When your timer goes off, remove the chicken with tongs and transfer to a large bowl to cool slightly.
Prep the Mayo : Crack your egg into a glass mixing cup and whisk on high with a handheld mixer or immersion blender for 20 seconds. Add 1/3 cup of avocado oil and blend again for 20 seconds. Repeat until you’ve added a total of 1 cup of oil. The mixture should emulsify into a thick, creamy mayo. Season with sea salt and refrigerate until ready to use. Note : I highly recommend making your own mayo here. Store-bought versions tend to have a more distinct flavor that can shift the entire recipe, and not in a good way. Every time I’ve made this with homemade mayo (and others have echoed this too), the final flavor is just cleaner, fresher, and way more balanced. Once you try it, you’ll notice the difference.
Shred the Chicken : Once the chicken has cooled slightly, transfer it to a stand mixer and mix on medium using the beater attachment until finely shredded. You can also shred by hand using two forks or a handheld mixer, but a stand up mixer is the easiest.
Refrigerate Overnight : I know this adds time to the prep, but trust me, it’s worth it. Refrigerating the chicken overnight (or at least a half day) makes the consistency creamier and helps prevent your homemade mayo from thinning out. Remember, we’re not using any thickeners or stabilizers – heat will break the mayo down. I like to prep the mayo and shredded chicken the day before, so all you have to do is mix and enjoy.
Mix It All Together : Add your mayo and any additional mix-ins, and stir until well combined. Chill for at least 15 – 30 minutes before serving to let the flavors meld together.
Best enjoyed within 3 days. Great with fruit, nuts, or flavored balsamic.
Highly recommended to make your own mayo. Store-bought versions tend to have a more distinct flavor that can shift the entire recipe – and not in a good way.
Prep Time:15 minutes
Chill Time:24 hours
Cook Time:17 minutes
Category:Main Dish
Method:Boiling + Mixing
Cuisine:American
Caitlin Lindsey
post author
Caitlin is the creative visionary behind Fit to Entertain, where food, wellness, and intentional living come together. She's passionate about helping others bring joy to the table and live beautifully - one meal at a time.


 Buy Now →


+ Show / Hide Comments
Share to: