I'm Caitlin - culinary hostess, wellness retreat curator, and homebody at heart. This blog is where I share seasonal recipes, intentional living tips, and behind-the-scenes moments from my kitchen, travels, and retreats.
Here to make healthy living feel thoughtful and approachable - one recipe, ritual, or gathering at a time.
WELCOME!
Affiliate links included. Thanks for supporting the brands I trust!
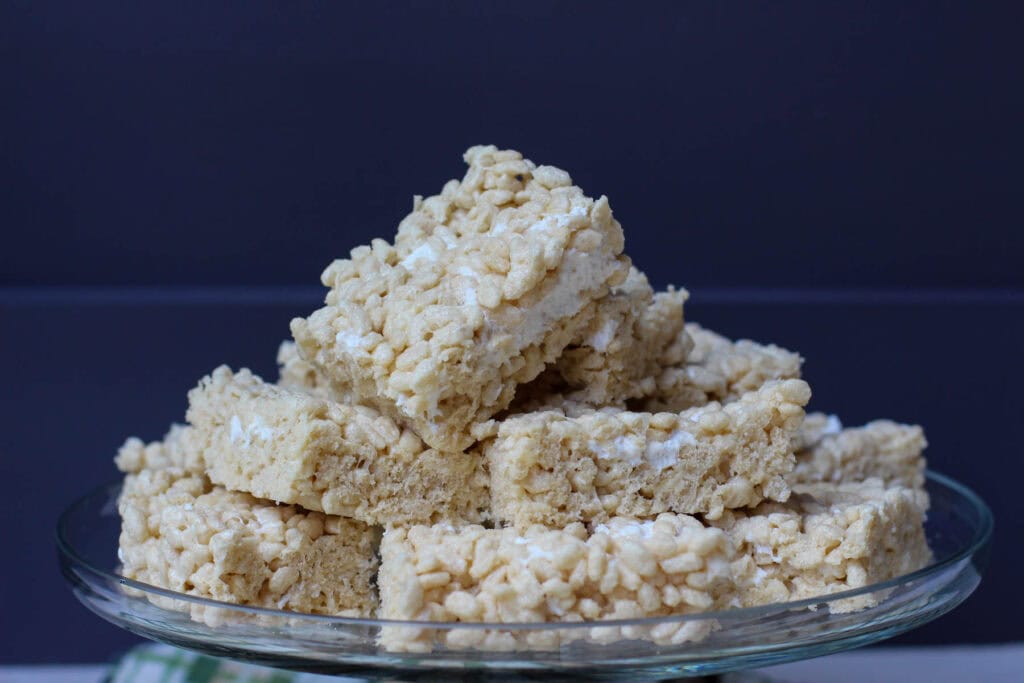
If you grew up loving classic Rice Krispie treats, you’re going to adore this better-for-you version that keeps all the nostalgic flavor, without all the junk. These gooey, chewy bars are made with simple ingredients you can feel good about, and they can be made dairy-free with just a few simple swaps. Whether you’re making a treat, prepping endurance fueling, or just reliving one of your childhood favorites, this recipe has your back.
Traditional rice krispie treats are delicious, but loaded with highly processed ingredients. This version uses Good Mallow marshmallows, high-quality butter, and sprouted brown rice crisps, making them perfect for anyone who wants a sweet snack or pre-workout fueling made with simpler, better for your ingredients.
They’re just as chewy, just as satisfying, and come together in minutes, no baking required!
Pro Tip : these are also gluten-free as long as you choose a certified GF crispy rice cereal.
Melt the Butter | In a large pot over medium-low heat, melt the butter until fully liquefied. For added depth of flavor, you can brown the butter slightly, just don’t let it burn.
Add and Melt Marshmallows | Lower the heat to low and add the marshmallows. Stir continuously for 8 – 10 minutes until melted. Note : If the marshmallows are clumping, add 1 – 2 tablespoons of milk and stir patiently, it takes longer than regular marshmallows but will smooth out.
Stir in Vanilla and Cereal | Once the mixture is smooth, turn off the heat. Stir in the vanilla and sea salt, then quickly fold in the crispy rice cereal until fully coated.
Press into the Pan | Transfer the mixture to your prepared pan (I prefer unbleached parchment paper). Use a greased spatula or your hands (lightly coated in butter) to gently press it into an even layer. Note : Don’t press too firmly, just enough to shape it. Over-packing = hard treats! Another way of making this easy is to place another piece of parchment paper on top and press down until everything is evenly distributed in the pan.
Cool and Cut | Let sit at room temperature for at least 30 minutes. Slice into squares and enjoy!
FREQUENTLY ASKED QUESTIONS
What kind of marshmallows work best?
I used Good Mallow Marshmallows, which are soy-free and made with simple ingredients. They melt beautifully with a little patience and a splash of milk. You can also use Dandies if soy free isn’t a preference or concern.
What if the marshmallows won’t melt?
These marshmallows are going to take a bit longer to melt and sometimes need help. Keep the heat low, add a splash of milk, and stir patiently.
Can I make these ahead of time?
Absolutely. They’ll stay fresh for up to 3 – 4 days at room temperature in an airtight container, and a bit longer if you keep them in the fridge!
Are these gluten-free?
Yes, as long as your crispy rice cereal is certified gluten-free. Double-check the label!
Can I freeze them?
You can! Freeze in layers with parchment between them. Thaw at room temperature for 30 – 60 minutes before serving.
STORAGE TIPS
Counter : Store in an airtight container for up to 4 days.
Fridge : Store in an airtight container for up to 7 days.
Freezer : Freeze individually wrapped treats for up to 1 month.
These chewy Rice Krispie Treats are made with vegan marshmallows and better-for-you ingredients. They’re nostalgic, delicious, and easy to make for a snack, treat, or endurance training fuel.
Ingredients
Scale
10 ounces Good Mallow Marshmallows
6 tablespoons Grass-Fed Butter (such as Kerrygold)
6 cups One Degree Organics Sprouted Brown Rice Crisps
Melt the Butter | In a large pot over medium-low heat, melt the butter until fully liquefied. For added depth of flavor, you can brown the butter slightly, just don’t let it burn.
Add and Melt Marshmallows | Lower the heat to low and add the marshmallows. Stir continuously for 8 – 10 minutes until melted. Note : If the marshmallows are clumping, add 1 – 2 tablespoons of milk and stir patiently, as it takes longer than regular marshmallows but will smooth out.
Stir in Vanilla and Cereal | Once the mixture is smooth, turn off the heat. Stir in the vanilla and sea salt, then quickly fold in the crispy rice cereal until fully coated.
Press Into the Pan | Transfer the mixture to your prepared pan (I prefer unbleached parchment paper). Use a greased spatula or your hands (lightly coated in butter) to gently press it into an even layer. Note : don’t press too firmly, just enough to shape it. Over-packing = hard treats! Another way of making this easy is to place another piece of parchment paper on top and press down until everything is evenly distributed in the pan (this is also a bit less messy on your hands).
Cool and Cut | Let sit at room temperature for at least 30 minutes. Slice into squares and enjoy!
Add a splash of milk if your marshmallows are clumping, this helps them melt smoothly.
Avoid over-packing the mixture when pressing into the pan for the best chewy texture.
Prep Time:5 minutes
Cool Time:30 minutes
Cook Time:10 minutes
Category:Dessert
Method:Stovetop
Cuisine:American
Caitlin Lindsey
post author
Caitlin is the creative visionary behind Fit to Entertain, where food, wellness, and intentional living come together. She's passionate about helping others bring joy to the table and live beautifully - one meal at a time.


 Buy Now →
  Buy Now →


+ Show / Hide Comments
Share to: